How to Set up Salesforce Experience Cloud?
The article was updated on October 16, 2025.
Every team dreams of a portal that finally works the way SF promises. Where customers find answers without tickets, partners see accurate deal data, and employees no longer fight for system access. Yet, Experience Cloud rollouts can stumble – often because setup decisions are rushed or misaligned.
Overall, Experience Cloud in Salesforce has become a strategic layer for engagement for many industries. What started as a portal solution has grown into an ecosystem itself: more than 5k sites and a community of fifty million people use it to share engagement.
And the momentum keeps gaining strength.
So, what is Salesforce Experience Cloud used for? What makes millions of users choose it over other solutions?
Viewed through a business lens, when you set up Salesforce Experience Cloud (and – what’s important – do it right), it bridges your internal systems and your external audiences and amplifies cooperation and collaboration across roles and organizations.
In this Salesforce Experience Cloud implementation guide, you’ll reveal how to enable Experience Cloud in Salesforce, learn how to troubleshoot if things take an unexpected turn, and what to do to optimize it for peak performance.
Preparing for Salesforce Experience Cloud Setup
Before we start with the configuration, let’s quickly recap the Salesforce Experience Cloud’s meaning.
Read Also: What is Salesforce Experience Cloud, and What You Get From It?
So, it’s a powerful platform that is used to build branded digital spaces. These can be your customer/agent/distributors/subcontractor portals, plus communities for your teammates and/or clients. On such a portal, the community(-ies) can connect, collaborate, and get the info they need.
In short, that’s what Salesforce Experience Cloud is used for: it turns fragmented communications into one cohesive engagement online.
Read Also: Salesforce Experience Cloud vs Custom Portal Development: Which Wins?
Now, let’s dive into the setup process. And there are a few things you need to consider and prepare.
Setting up Experience Cloud is an exciting endeavor that can transform the way your organization interacts with its stakeholders. To ensure a smooth and successful setup, it is essential to pay attention to both technical requirements and strategic planning.
Technical Requirements for Setup
Ensure that your organization meets the technical requirements to set up Salesforce Experience Cloud (Community Cloud).
These requirements may include:
- Stable internet connection. A reliable internet connection is crucial for seamless access to your community platform.
- Supported web browsers. Make sure that your preferred web browsers are compatible with Salesforce Experience Cloud for optimal performance.
- Sufficient storage and computing resources. Allocate enough storage space and computing resources to support the smooth functioning of your community.
- Integration capabilities with other systems. Consider the need for integrating Salesforce Experience Cloud with other systems to streamline processes and enhance user experience.
By meeting these technical requirements, you can lay a strong foundation for a robust and efficient Salesforce solution implementation.
Planning Your Salesforce Experience Cloud Implementation
Building a successful Salesforce Experience Cloud site starts with proper planning.
Here are some key considerations to get you started:
- Identify the goals and objectives of your community. Clearly define the purpose of your community platform and what you aim to achieve through it.
- Define the target audience for your community. Determine whether your community will cater to customers, partners, employees, or a combination of these groups.
- Outline the desired user experience and functionality. Envision how you want users to interact with your community and the features you want to offer to enhance their experience.
- Map out the content and resources you want to make available in your community. Plan the information, resources, and tools you want to provide to users within your community.
- Consider any integration requirements with existing Salesforce or third-party systems. Evaluate the need for integrating Salesforce Experience Cloud with other systems to ensure seamless data flow and functionality.
By carefully planning your Salesforce Experience Cloud implementation, you can align your platform with your organizational goals and create a valuable and engaging experience for your community members.
Don’t know how to set up Salesforce Experience Сloud and feel at a loss when reading this all? Synebo’s experts can help you shape, launch, and fine-tune your portal – it will feel effortless for your users and effective – for your business. Contact us.
6 Steps to Set Up Salesforce Experience Cloud
We will take you through the step-by-step process to help you set up the Salesforce Experience Cloud site, including integrating it with the InCountry platform (if needed).
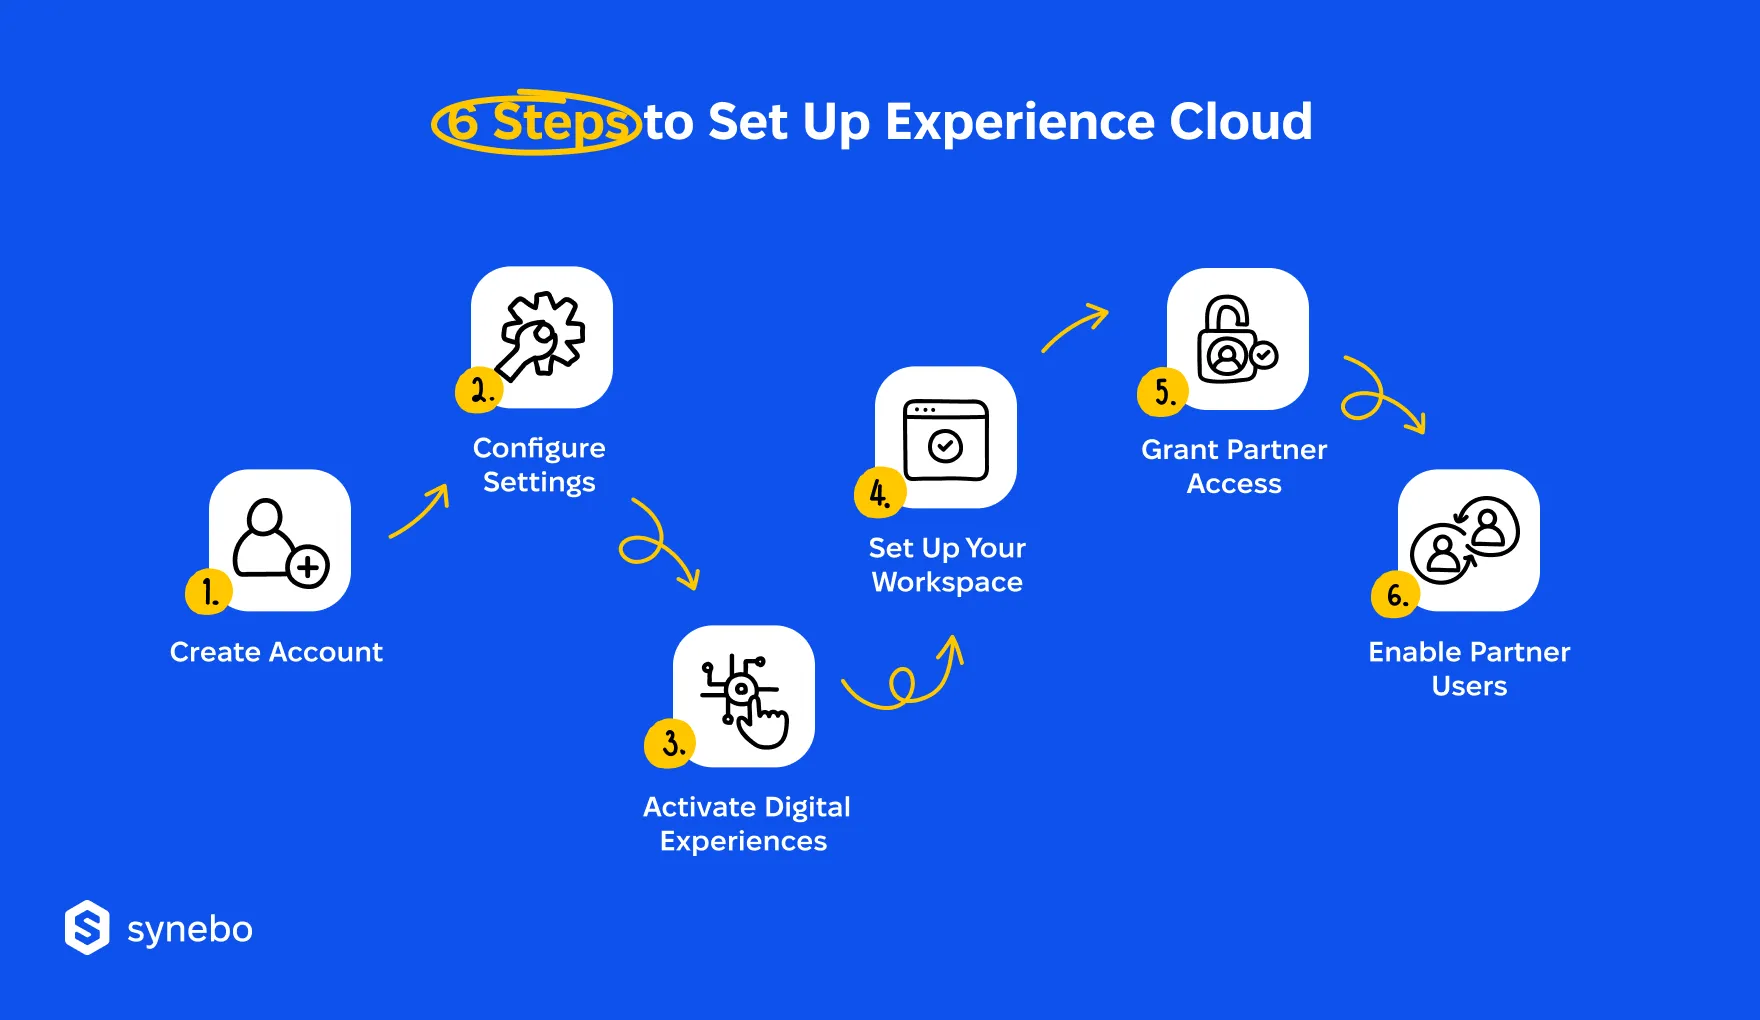
Step 1: Creating Your Salesforce Experience Cloud Account
The first step is to create your Salesforce Experience Cloud account.
Follow these steps to proceed:
- Log in to your Salesforce admin account.
- Navigate to the “App Launcher” and search for “Experience Builder”.
- Click on “Experience Builder” to launch the setup wizard.
- Follow the prompts to create your community, including selecting a template, defining the community name, and configuring the community settings.
- Review and save your community settings.
Creating your Salesforce Experience Cloud account is an essential part of the setup process. It allows you to access all the features and functionalities that Experience Cloud has to offer. By logging in to your Salesforce admin account, you can ensure that you have the necessary permissions and privileges to create and manage your community effectively.
Step 2: Configuring Your Salesforce Experience Cloud Settings
Next, configure the settings of your Experience Cloud in Salesforce to align with your organization’s requirements.
Yet, before creating portals and user accounts, you’ll need to:
- Define user roles. In the Setup menu, go to Users window, and choose the user account with the “System Administrator profile”.
- Enable permissions. To enable the “Manage External Users” permission for the “InCountry Admin” user, navigate to Setup > Users > Permission Sets, select the user, and then under App Permissions, check the box for “Manage External Users”.
Step 3: Activating Digital Experiences
Enabling Digital Experiences is the foundation for any Experience Cloud site, whether it’s a community, portal, help center, or website.
This is how to do it:
- Navigate to Settings. In Salesforce Setup, go to Feature Settings and then click Digital Experiences. Select Settings.
- Enable Digital Experiences. On the Settings page, check the box labeled “Enable Digital Experiences”.
- Choose a Domain Name
-
-
- Enhanced Domains Enabled. If your org uses enhanced domains, your digital experiences domain will be displayed in the format http://YourDomainName.yoursite.com (for production orgs).
- Enhanced Domains Disabled. If not, choose a new domain name and click Check Availability to verify it’s free. You can set a custom domain later on the Domain Management page (Setup > User Interfaces > Sites and Domains > Domains).
-
- Enable Self-Registration (Optional). Check the box labeled “Allow using standard external profiles for self-registration, user creation, and login” if you want users to register themselves on your Experience Cloud sites.
- Save Changes. Click “Save” to activate digital experiences in your Salesforce org.
Step 4: Setting Up Your Workspace
Experience Workspaces provide a central hub for managing, building, and overseeing your site.
Your next steps are the following:
- Access the Site Creation Wizard
-
-
- In Salesforce Setup, navigate to Digital Experiences and select “All Sites”.
- Click “New” to open the site creation wizard.
-
- Choose a Template
-
-
- The wizard displays various template options to jumpstart your site design.
- For instance, select the “Salesforce Tabs + Visualforce template” if you want a combination of Salesforce tabs and custom Visualforce pages.
-
- Start Building Your Site
-
-
- Click “Get Started” to proceed with the chosen template.
- Enter a descriptive name for your site and click “Create”.
-
- Manage Workspace Permissions
-
-
- You’ll be automatically directed to the site in Preview mode.
- To manage user access, switch to the Administration section from your “My Workspaces” list.
-
- Assign User Roles
-
-
- In the Members section, drag the “External Apps User” profile to the “Selected Profiles” list. This grants basic user access to your Experience Cloud site.
- Depending on your organization’s needs, additional profiles might be available in the “Available Profiles” list.
- Assign the necessary profiles accordingly.
-
- Grant Administrative Permissions. From the “Available Permission Sets” list, drag the “InCountry Admin” permission set to the “Selected Permission Sets” list. This grants administrative capabilities for managing the site within your region (optional, adjust based on your needs).
- Save Your Configuration. Click “Save” to finalize the initial setup of your Experience Cloud site with the chosen user roles and permissions.
Note: This is a general guide, and specific permission sets or profiles might vary based on your organization’s needs.
Step 5: Grant Partner Access in Lightning Experience
Once Digital Experiences are enabled, Salesforce might add partner-related actions to your account and contact page layouts.
Here’s how to configure actions for managing partner accounts and users in SF Lightning Experience:
Checking Existing Partner Actions
- Navigate to Accounts. Open the “InCountry” application and select “Accounts”.
- Open an Account. Select the “All Accounts” list view and pick an account record that has a related contact.
- Verify Partner Action. Click the dropdown menu (often indicated by three dots) to see available quick actions. Look for “Enable as Partner”.
-
-
- Found: If you see “Enable as Partner”, skip to the next section on enabling partner accounts and users.
- Missing: If you don’t see “Enable as Partner”, follow the steps below to add it.
-
Adding Partner Actions to Page Layouts
For Accounts:
- Go to Setup. In Salesforce Setup, navigate to “Object Manager”.
- Access Account Page Layout. Select “Account”, then click “Page Layouts” and choose “Account Layout”.
- Edit Mobile & Lightning Actions. In the page layout editor, click “Mobile & Lightning Actions”. (You might need to click the properties icon first to override customizations.)
- Add Partner Actions. Drag the following buttons to the “Salesforce Mobile and Lightning Experience Actions” section:
-
-
- Enable as Partner
- Disable Partner Account
- Disable Customer Account
-
- Save Changes. Click “Quick Save”.
For Contacts:
- Repeat for Contacts. Follow steps 1-3 from the “For Accounts” section, but select “Contact” instead in step 2.
- Add User Actions. Drag the following buttons to the “Salesforce Mobile and Lightning Experience Actions” section:
-
-
- Enable Partner User
- Enable Customer User
-
- Save Changes. Click “Quick Save”.
By completing these steps, you’ll ensure the necessary actions are available to manage partner accounts and users within your Lightning Experience interface.
Step 6: Enabling Partner Users and Logging In
Now you can enable partner users and log them into your Experience Cloud Salesforce workspace.
Here’s how your process will unfold:
- Enable Partner Account
-
-
- Open the “InCountry” application and navigate to “Accounts”.
- Select the “All Accounts” list view and choose an account record with a related contact.
- Click the dropdown menu (often indicated by three dots) to see available actions.
- Select “Enable as Partner”. Confirm your choice in the pop-up window.
-
- Enable Partner User (Optional)
-
-
- Once the account is a partner, you can enable a specific contact as a partner user.
- On the same account record detail page, locate the contact and click the dropdown menu.
- Look for “Enable Partner User” and select it.
-
- Create Partner User (if not done in step 2)
-
-
- After enabling the partner user option, you’ll be redirected to create the user profile.
- Fill in the required fields like “Last Name”, “Alias”, “Email”, “Username”, and “Nickname”.
- Click “Save” to create the partner user.
-
- Log In to Partner Workspace
-
-
- Return to the contact record detail page.
- In the dropdown menu, you’ll now see “Log in to Experience as User”.
- Click “Log in to Experience as User” and choose the partner’s designated workspace name from the list.
- You’ll be redirected and successfully logged in to the partner’s workspace.
-
Configuring your Salesforce Experience Cloud settings allows you to tailor the platform to suit your specific business needs. The “Settings” section offers a comprehensive range of options, enabling you to customize everything from the branding and navigation to the authentication and content delivery methods.
Don’t forget to save your settings and preview your community to ensure that all the changes are applied correctly.
Troubleshooting Common Setup Issues
Setting up a new system or platform can be a complex process, and it’s natural to run into some roadblocks along the way. By being prepared and knowing how to troubleshoot common setup issues, you can ensure a smoother implementation process.
Despite careful planning and execution, it is not uncommon to encounter a few challenges during the setup process. Here are some common issues you may encounter and how to address them.
Resolving Login and Access Issues
Your users are experiencing login or access issues?
Follow these troubleshooting steps:
- Ensure that users have the necessary access permissions to the community.
- Verify that the user profiles and permission sets are properly configured.
- Check if there are any login restrictions in place or conflicting security settings.
- Review the community login settings and verify that they align with your organization’s requirements.
Access and login issues can often be frustrating for users and hinder their productivity. By following these steps, you can quickly identify and address the root cause of these problems, ensuring a seamless user experience.
Addressing Configuration Problems
You may encounter some configuration problems.
If this is the case, follow these steps to resolve them:
- Double-check the configuration settings and ensure that they are aligned with best practices and your organization’s requirements.
- Review any error messages or logs to identify the root cause of the configuration concern.
- Consult the Salesforce Experience Сloud documentation and online resources for troubleshooting guidance.
- If needed, contact Salesforce support or your implementation partner for assistance.
Configuration issues can sometimes be complex and require a systematic approach to resolve. By following these steps and leveraging available resources, you can effectively troubleshoot and address any configuration issues that may arise during the setup process.
Having trouble with setup or configuration issues? Reach out to a Salesforce Experience Cloud consultant in Synebo and get practical, hands-on support.
Optimizing Your Salesforce Experience Cloud Setup
Creating a seamless and user-friendly experience within Salesforce Experience Cloud involves more than just the initial setup. It requires ongoing attention and strategic enhancements to meet the evolving needs of your community members. By implementing best practices and following key tips, you can elevate the performance and impact of your Experience Cloud instance.
Best Practices for Salesforce Experience Cloud Use
Here are some best practices for effectively using Experience Cloud Salesforce:
- Content updates. Regularly review and update your community content to ensure relevancy and accuracy.
- Foster engagement. Promote community engagement by encouraging user participation and feedback.
- Tack user activity. Monitor community analytics and usage metrics to gain insights into user behavior and preferences.
- Conduct targeted community outreach. Regularly communicate with your community members through newsletters, announcements, and targeted campaigns.
Consistent content maintenance is essential for keeping your community members engaged and informed. By regularly updating and refining your content, you can ensure that users are accessing the most relevant and up-to-date information.
Encouraging active participation through discussions, polls, and surveys fosters a sense of belonging and ownership among community members, leading to increased engagement and loyalty.
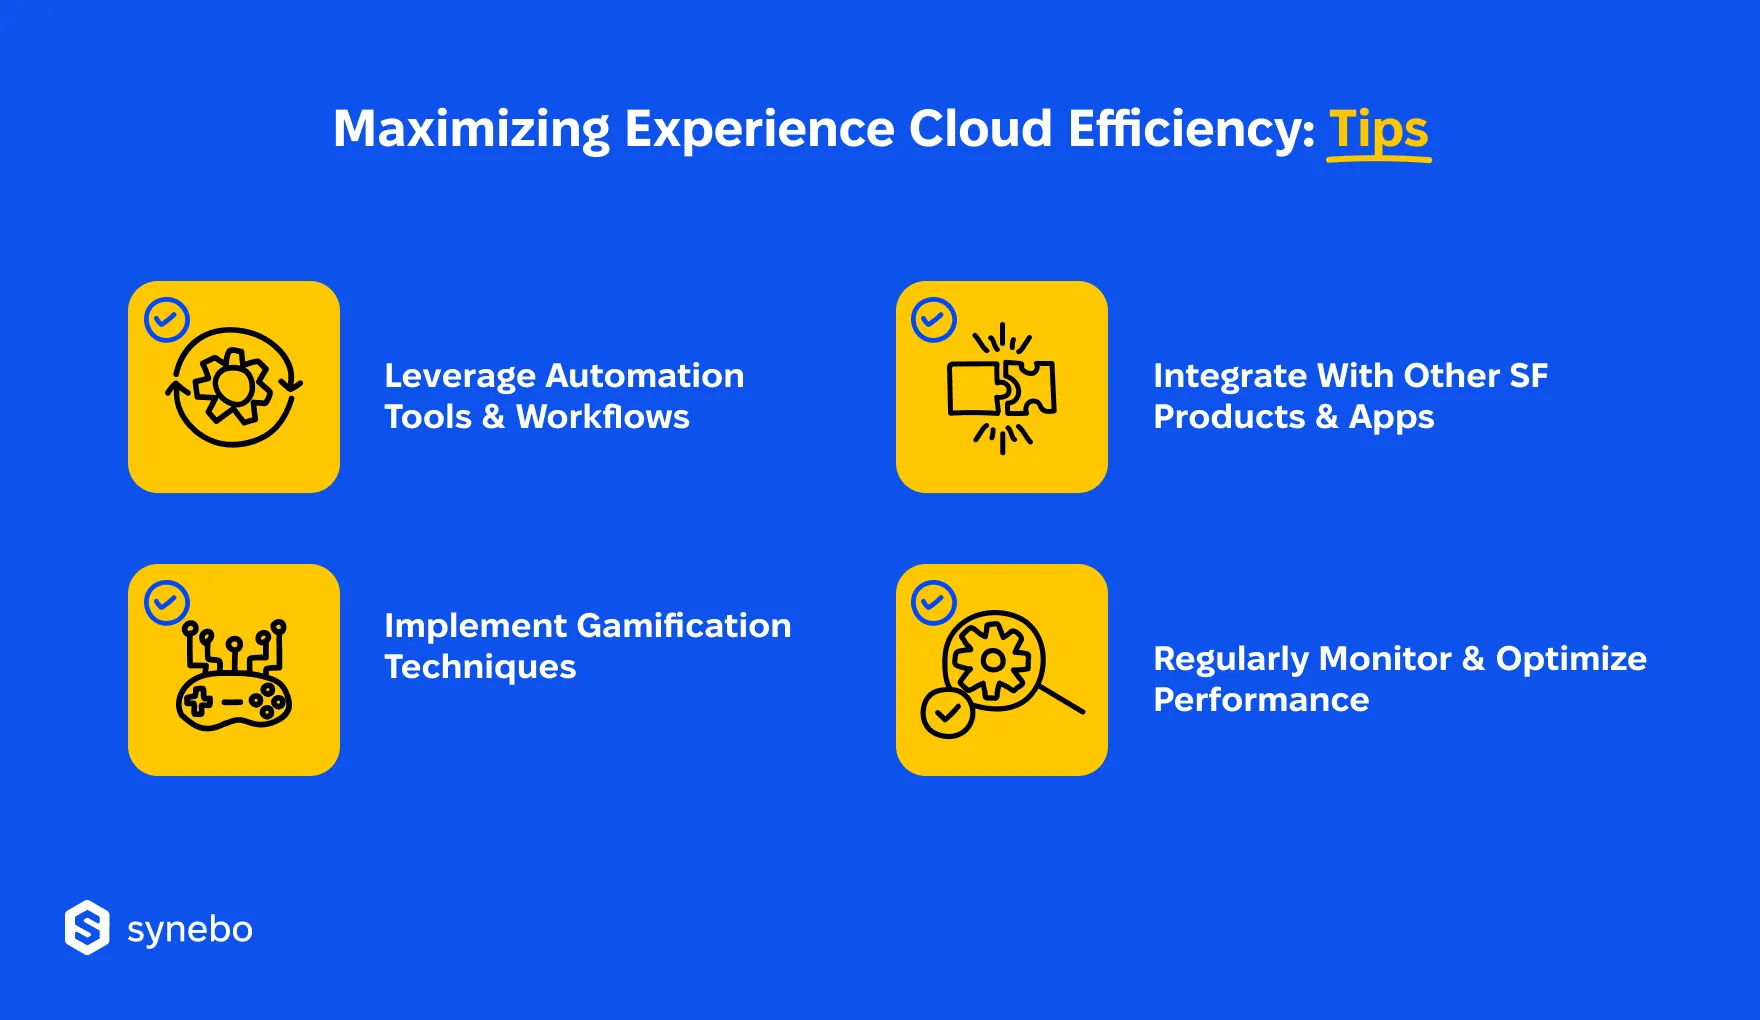
Tips for Maximizing Salesforce Experience Cloud Efficiency
Consider these tips to maximize the efficiency of your Salesforce Experience Cloud setup:
- Automate workflows. Leverage automation tools and workflows to streamline community processes and reduce manual effort.
- Gamify engagement. Implement gamification techniques to drive user engagement and incentivize participation.
- Integrate systems. Integrate your community with other Salesforce products or third-party systems to enhance functionality and data exchange.
- Optimize performance. Regularly monitor and optimize the performance of your community by analyzing loading times and user feedback.
Automation plays a crucial role in simplifying complex tasks and ensuring consistency across your community platform. By automating routine processes such as user onboarding, content moderation, and notifications, you can free up valuable time and resources to focus on strategic initiatives.
Read Also: Best Ways to Use ChatGPT in Salesforce
Gamification elements like badges, leaderboards, and rewards can motivate users to interact more actively within the community, driving higher engagement levels and fostering a sense of friendly competition.
Maintaining Your Salesforce Experience Cloud Setup
Regular maintenance is key to keeping your Salesforce Experience Cloud setup running smoothly and effectively. By following a few simple tasks, you can ensure that your community remains relevant, user-friendly, and up-to-date.
Once your Salesforce Experience Cloud setup is in place, it is crucial to perform regular maintenance to ensure its continued success.
Regular Maintenance Tasks
Include these tasks in your regular maintenance schedule:
- Refresh community content. Periodically update articles, blog posts, and other resources to ensure that they remain relevant and useful for community members.
- Analyze community metrics. Examine community analytics and usage metrics to identify areas for improvement and gain insights into how to enhance the community experience.
- Track Salesforce updates. Regularly check for new Salesforce updates or feature releases that may impact your community, ensuring you leverage new functionalities as they become available.
- Respond to user feedback. Monitor and address user feedback and complaints to identify and solve any usability or functionality issues, thereby enhancing the community experience.
Updating and Upgrading Your Salesforce Experience Cloud
Stay up-to-date with the latest Salesforce Experience Cloud features and enhancements by following these steps:
- Monitor Salesforce releases. Regularly check Salesforce release notes and documentation to stay updated with new features and understand how they might impact your community.
- Test upgrades in sandbox. Before implementing upgrades in your production community, plan and test them in a sandbox environment to detect any potential issues or conflicts early.
- Check compatibility. Ensure that your customizations and integrations are compatible with new versions of the Experience Cloud to avoid disruptions or loss of functionality during upgrades.
- Communicate upgrade details. Inform your community members about the upgrade timeline and any necessary training. Effective communication helps minimize disruptions and ensures a smooth transition.
By following these maintenance tasks and upgrade steps, you can maximize the value and effectiveness of your Experience Cloud Salesforce setup. Regular maintenance and staying up-to-date with the latest features and enhancements will help you provide an exceptional experience for your community members.
Synebo: Your Salesforce Experience Cloud Partner for Success
Building an Experience Cloud site usually goes further than deploying another portal. Relying on this SF Сloud shapes a dynamic environment where your audiences, data, and workflows meet in a single trusted space.
When you build the space with care, it elevates every interaction of your customers, fosters synergy across all users involved, and overall supports your business as it grows.
Yet, reaching that level of performance can demand more than your internal effort. Because the layers of configuration, security, plus design often require a steady hand and a strategic eye. With expert Salesforce Experience Cloud services, your platform becomes finely tuned, and every connection, workflow, and insight here pushes your strategy forward.
Our Salesforce-certified Experience Cloud consultants help companies expertly design, implement, and optimize Experience Cloud so that every element – from architecture to automation – works together efficiently.
Reach out to Synebo for the Salesforce Experience Cloud consulting services – turn your portal into a working ecosystem that engages users and transforms the way your business interacts with your audience.
Experience Cloud is Salesforce’s platform that lets companies build branded & secure spaces/portals. Those portals connect your intended audiences – team members, collaborators, vendors, agents, distributors, and so on. It acts as an interactive layer over your CRM and allows your users to access info, submit cases, manage tasks, and more – all inside a consistent, permission-based environment integrated into the SF ecosystem.
The former evolved into the latter. The rebrand brought modern templates, much advanced personalization, and a more appealing interface. Functionally, Experience Cloud is the next iteration of the same concept: building connected communities – now with richer analytics, better UX, and breezier config for faster deployment and stronger outcomes in engagement.
Yes, and for a sound reason. A branded (sub-)domain contributes to trust in your brand, SSL security, and pro presentation. It gives your site identity. It also protects your user data through НТТРS. Plus, it supports compІiance standards. What’s more, it keeps your brand consistent online, so every visitor instantly sees the portal as an authentic part of your organization.
This Cloud offers several site types. You can open Customer Account Portals for your clients, set up Help Centers for fast answers, use Partner Central for visibility into deals and collaboration. If you want something your own, custom Experience Sites are your blank canvas. By combining templates, permissions, and Lightning components, admins can design bespoke solutions
Yes. SF enables multilingualism and allows localization of content, UІ elements, and navigation. It supports over a hundred languages, so global teams & customers can interact in their mother tongues. Overall, global and local companies can scale worldwide effortlessly, maintain clean setups (no duplicating configurations), and a consistent voice.
Salesforce Experience Cloud pricing depends on the site type, user volume, and Salesforce Experience Cloud license cost. Generally, costs scale with usage – whether you рау реr login, per member, or through an enterprise agreement. SF also tries to be adaptable for both growing teams and large, compliance-heavy firms, so it offers multiple editions with different levels of storage, analytics, and automation features.